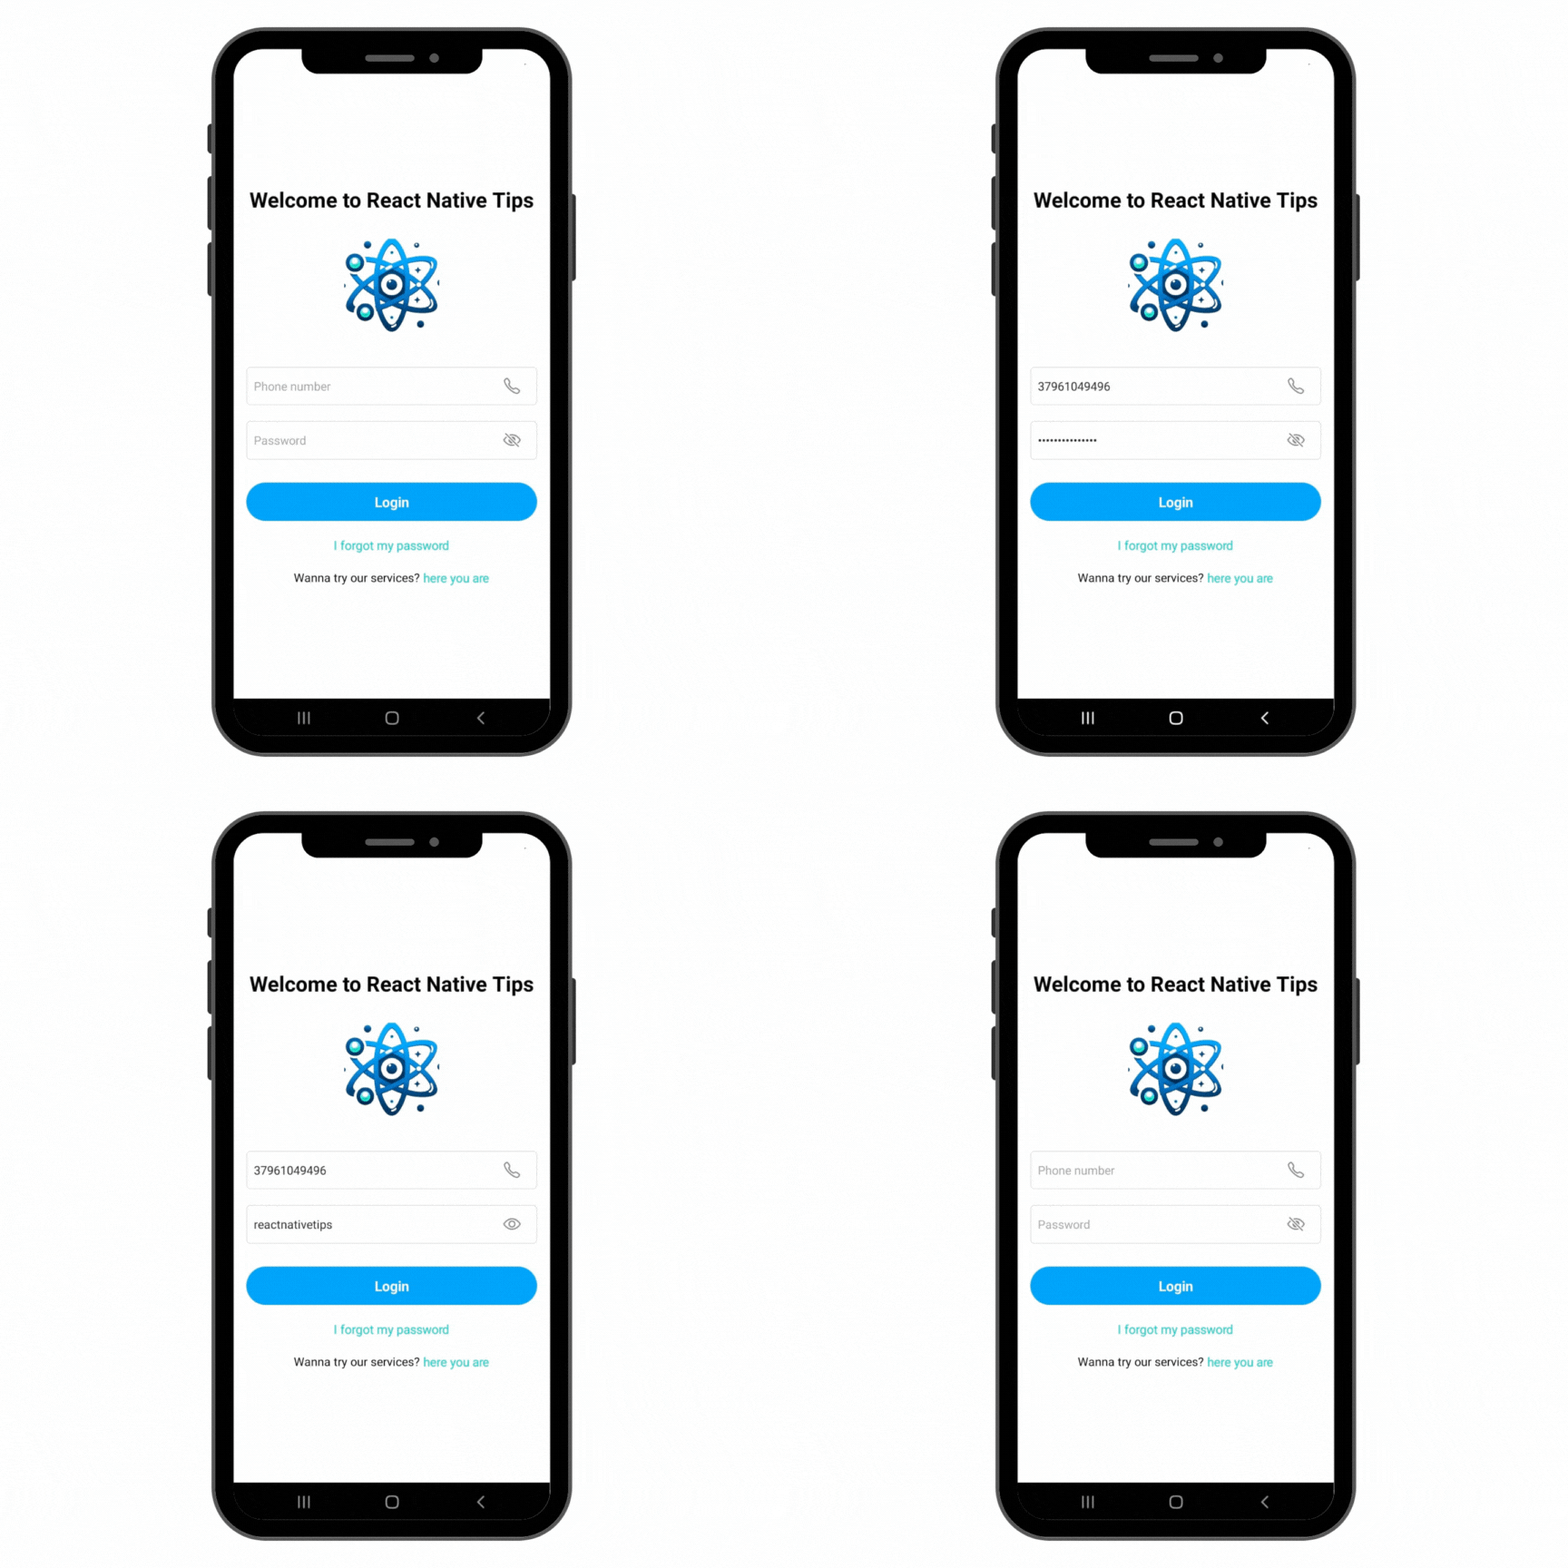
Creating a login screen is a fundamental step in app development. This tutorial details how to Create a React Native Login Screen, covering user input handling, UI enhancements with icons, and responsive design

Step 1: Setting Up State with useState
First, use the useState hook to manage the input fields and password visibility.
import React, { useState } from "react";

const [phoneNumber, setPhoneNumber] = useState("");
const [password, setPassword] = useState("");
const [passwordVisible, setPasswordVisible] = useState(false);

const togglePasswordVisibility = () => {
  setPasswordVisible(!passwordVisible);
};
- phoneNumber and password store the user’s inputs. These states are initialized to empty strings.
- passwordVisible toggles the visibility of the password, initialized to false to hide the password by default.
- togglePasswordVisibility changes the state of passwordVisible to the opposite of its current value, allowing users to toggle password visibility.
Step 2: Structuring the Main Container
Create the main View container to hold all the UI elements.
<View style={styles.container}>
  {/* Other components will go here */}
</View>
- The
Viewcomponent is the main container that centers its child components. It usesstyles.containerto apply the desired styles.
Step 3: Adding a Title
Add a title to your screen using the Text component.
<Text style={styles.title}>Welcome to React Native Tips</Text>
- The
Textcomponent displays the title of the login screen. Thestyles.titleis used to style the text appropriately.
Step 4: Displaying the Logo
Use the Image component to include a logo in your login screen.
<Image
  source={require("./../assets/login_logo.png")}
  style={styles.logoIcon}
/>
- The
Imagecomponent shows the app logo, enhancing the screen’s visual appeal. Thestyles.logoIconapplies styles to the image.
Step 5: Creating the Phone Number Input
Set up the phone number input field with an accompanying icon.
<View style={styles.inputContainer}>
  <TextInput
    style={styles.input}
    onChangeText={setPhoneNumber}
    value={phoneNumber}
    placeholder="Phone number"
    keyboardType="phone-pad"
  />
  <Ionicons
    name="call-outline"
    size={24}
    color="grey"
    style={styles.phoneIcon}
  />
</View>
- TextInput captures the phone number and updates the
phoneNumberstate usingonChangeText. - Ionicons adds a phone icon inside the input field for better UX, using
styles.phoneIconfor positioning.
Step 6: Setting Up the Password Input
Create the password input field and add an eye icon for toggling visibility.
<View style={styles.inputContainer}>
  <TextInput
    style={styles.input}
    onChangeText={setPassword}
    value={password}
    placeholder="Password"
    secureTextEntry={!passwordVisible}
  />
  <TouchableOpacity
    onPress={togglePasswordVisibility}
    style={styles.eyeIcon}
  >
    <Ionicons
      name={passwordVisible ? "eye-outline" : "eye-off-outline"}
      size={24}
      color="grey"
    />
  </TouchableOpacity>
</View>
- TextInput captures the password and updates the
passwordstate. ThesecureTextEntryprop is toggled based onpasswordVisible. - TouchableOpacity wraps the eye icon to make it tappable, toggling password visibility on press.
Step 7: Creating the Login Button
Add a login button using TouchableOpacity.
<TouchableOpacity style={styles.button}>
  <Text style={styles.buttonText}>Login</Text>
</TouchableOpacity>
- TouchableOpacity creates a button that triggers the
handleLoginfunction when pressed. Thestyles.buttonandstyles.buttonTextapply styles.
Step 8: Adding Additional Options
Add extra text components for options like “Forgot Password?” and signing up.
<Text style={styles.forgotPassword}>I forgot my password</Text>
<View style={styles.signupContainer}>
  <Text>Wanna try our services?</Text>
  <TouchableOpacity>
    <Text style={styles.signupText}>here you are</Text>
  </TouchableOpacity>
</View>
- These text components provide additional actions for the user, enhancing usability. The
TouchableOpacityallows the “Sign up here” text to be tappable.
Step 9: Styling the Components
Style each component for responsiveness and aesthetics.
const styles = StyleSheet.create({
  container: {
    flex: 1,
    alignItems: "center",
    justifyContent: "center",
    padding: wp("4%"),
    backgroundColor: "#fff",
  },
  title: {
    fontSize: wp("6%"),
    marginBottom: hp("3%"),
    fontWeight: "bold",
  },
  logo: {
    marginBottom: hp("6%"),
  },
  input: {
    height: hp("7%"),
    width: "100%",
    marginVertical: hp("1%"),
    borderWidth: 1,
    padding: wp("2.5%"),
    borderRadius: 5,
    borderColor: "#ddd",
  },
  button: {
    backgroundColor: "#01a5fc",
    borderRadius: 25,
    padding: wp("3%"),
    alignItems: "center",
    marginTop: hp("2.5%"),
    width: '100%',
  },
  buttonText: {
    color: "#fff",
    fontWeight: "bold",
    fontSize: wp("4%"),
  },
  forgotPassword: {
    color: "#0ed1c0",
    marginTop: hp("2.5%"),
    fontSize: wp("3.5%"),
  },
  signupContainer: {
    flexDirection: "row",
    marginTop: hp("2.5%"),
  },
  signupText: {
    color: "#0ed1c0",
    marginLeft: wp("1%"),
    fontSize: wp("3.5%"),
  },
  logoIcon: {
    width: wp("30%"),
    height: wp("30%"),
    marginTop: hp("1%"),
    marginBottom: hp("4%"),
  },
  inputContainer: {
    flexDirection: "row",
    alignItems: "center",
    width: "100%",
  },
  input: {
    flex: 1,
    height: 50,
    marginVertical: 10,
    borderWidth: 1,
    padding: 10,
    borderRadius: 5,
    borderColor: "#ddd",
  },
  eyeIcon: {
    position: "absolute",
    right: wp("2.5%"),
    padding: wp("2.5%"),
  },
  phoneIcon: {
    position: "absolute",
    right: wp("2.5%"),
    padding: wp("2.5%"),
  },
});
- The styles enhance the visual appearance and ensure the components are responsive.
Step 10: Implementing Security Best Practices
Secure Password Handling
- Encryption: Ensure passwords are encrypted before being sent to the server. Use HTTPS for all communications to protect data in transit.
- Hashing: On the server-side, store passwords using a secure hashing algorithm like bcrypt.
- Input Validation: Validate inputs on both client-side and server-side to prevent injection attacks.
Example of Secure Password Handling:
const handleLogin = () => {
  const userData = { phoneNumber, password };

  // Encrypt the password here if necessary before sending it
  axios
    .post("https://yourapi.com/login", userData)
    .then((response) => {
      Alert.alert("Login Successful", "Welcome back!");
    })
    .catch((error) => {
      Alert.alert("Login Failed", "Please check your credentials");
    });
};
Input Sanitization
- Sanitize Inputs: Remove any potentially malicious content from user inputs to prevent cross-site scripting (XSS) and SQL injection attacks.
- Use Libraries: Utilize libraries like DOMPurify for sanitizing HTML inputs.
Example of Input Validation:
const validatePhoneNumber = (phone) => {
  const phoneRegex = /^[0-9]{10}$/;
  return phoneRegex.test(phone);
};

const validatePassword = (password) => {
  // Add your validation logic here
  return password.length >= 6;
};
Managing Sessions Securely
- Token Management: Use secure tokens (e.g., JWT) for managing user sessions. Store tokens securely in HttpOnly cookies.
- Session Expiration: Implement session expiration and renewal mechanisms to enhance security.
Example of Token Management:
const handleLogin = () => {
  const userData = { phoneNumber, password };

  axios
    .post("https://yourapi.com/login", userData)
    .then((response) => {
      // Store token securely
      const token = response.data.token;
      // Save token in HttpOnly cookie or secure storage
    })
    .catch((error) => {
      Alert.alert("Login Failed", "Please check your credentials");
    });
};
Additional Explanations and Best Practices
Input Field Validations:
Add detailed explanations on input validation for phone numbers and passwords.
const validatePhoneNumber = (phone) => {
  const phoneRegex = /^[0-9]{10}$/;
  return phoneRegex.test(phone);
};
- Use
validatePhoneNumberto ensure the phone number is in the correct format. - Use
validatePasswordto ensure the password meets the minimum length requirement.
const validatePhoneNumber = (phone) => {
  const phoneRegex = /^[0-9]{10}$/;
  return phoneRegex.test(phone);
};

const validatePassword = (password) => {
  return password.length >= 6;
};
Error Handling:
Handle errors from the backend and display user-friendly messages.
const handleLogin = () => {
  const userData = { phoneNumber, password };

  axios.post("https://yourapi.com/login", userData)
    .then((response) => {
      Alert.alert("Login Successful", "Welcome back!");
    })
    .catch((error) => {
      Alert.alert("Login Failed", "Please check your credentials");
    });
};
User Feedback:
Provide feedback to users during login attempts (e.g., loading indicators).
const handleLogin = () => {
  setIsLoading(true);
  const userData = { phoneNumber, password };

  axios.post("https://yourapi.com/login", userData)
    .then((response) => {
      setIsLoading(false);
      Alert.alert("Login Successful", "Welcome back!");
    })
    .catch((error) => {
      setIsLoading(false);
      Alert.alert("Login Failed", "Please check your credentials");
    });
};
Secure Password Storage:
Discuss secure storage options for tokens and sensitive data.
axios.post("https://yourapi.com/login", userData)
  .then((response) => {
    // Store token securely
    const token = response.data.token;
    SecureStore.setItemAsync("userToken", token);
  })
  .catch((error) => {
    Alert.alert("Login Failed", "Please check your credentials");
  });
Enhancing UX with Animations:
Add subtle animations to improve the user experience.
<TouchableOpacity
  style={[styles.button, { opacity: isLoading ? 0.5 : 1 }]}
  onPress={handleLogin}
  disabled={isLoading}
>
  {isLoading ? (
    <ActivityIndicator size="small" color="#fff" />
  ) : (
    <Text style={styles.buttonText}>Login</Text>
  )}
</TouchableOpacity>
Complete Code:
import React, { useState } from "react";
import {
  StyleSheet,
  View,
  Text,
  TextInput,
  TouchableOpacity,
  Image,
} from "react-native";
import {
  widthPercentageToDP as wp,
  heightPercentageToDP as hp,
} from "react-native-responsive-screen";
import Ionicons from "react-native-vector-icons/Ionicons";

const LoginScreen = () => {
  const [phoneNumber, setPhoneNumber] = useState("");
  const [password, setPassword] = useState("");

  const [passwordVisible, setPasswordVisible] = useState(false);

  const togglePasswordVisibility = () => {
    setPasswordVisible(!passwordVisible);
  };

  return (
    <View style={styles.container}>
      <Text style={styles.title}>Welcome to React Native Tips</Text>

      <Image
        source={require("./../assets/login_logo.png")}
        style={styles.logoIcon}
      />

      <View style={styles.inputContainer}>
        <TextInput
          style={styles.input}
          onChangeText={setPhoneNumber}
          value={phoneNumber}
          placeholder="Phone number"
          keyboardType="phone-pad"
        />

        <Ionicons
          name="call-outline"
          size={24}
          color="grey"
          style={styles.phoneIcon}
        />
      </View>

      <View style={styles.inputContainer}>
        <TextInput
          style={styles.input}
          onChangeText={setPassword}
          value={password}
          placeholder="Password"
          secureTextEntry={!passwordVisible}
        />
        <TouchableOpacity
          onPress={togglePasswordVisibility}
          style={styles.eyeIcon}
        >
          <Ionicons
            name={passwordVisible ? "eye-outline" : "eye-off-outline"}
            size={24}
            color="grey"
          />
        </TouchableOpacity>
      </View>

      <TouchableOpacity style={styles.button}>
        <Text style={styles.buttonText}>Login</Text>
      </TouchableOpacity>

      <Text style={styles.forgotPassword}>I forgot my password</Text>

      <View style={styles.signupContainer}>
        <Text>Wanna try our services?</Text>
        <TouchableOpacity>
          <Text style={styles.signupText}>here you are</Text>
        </TouchableOpacity>
      </View>
    </View>
  );
};

const styles = StyleSheet.create({
  container: {
    flex: 1,
    alignItems: "center",
    justifyContent: "center",
    padding: wp("4%"),
    backgroundColor: "#fff",
  },
  title: {
    fontSize: wp("6%"),
    marginBottom: hp("3%"),
    fontWeight: "bold",
  },
  logo: {
    marginBottom: hp("6%"),
  },
  input: {
    height: hp("7%"),
    width: "100%",
    marginVertical: hp("1%"),
    borderWidth: 1,
    padding: wp("2.5%"),
    borderRadius: 5,
    borderColor: "#ddd",
  },
  button: {
    backgroundColor: "#01a5fc",
    borderRadius: 25,
    padding: wp("3%"),
    alignItems: "center",
    marginTop: hp("2.5%"),
    width: '100%',
  },
  buttonText: {
    color: "#fff",
    fontWeight: "bold",
    fontSize: wp("4%"),
  },
  forgotPassword: {
    color: "#0ed1c0",
    marginTop: hp("2.5%"),
    fontSize: wp("3.5%"),
  },
  signupContainer: {
    flexDirection: "row",
    marginTop: hp("2.5%"),
  },
  signupText: {
    color: "#0ed1c0",
    marginLeft: wp("1%"),
    fontSize: wp("3.5%"),
  },
  logoIcon: {
    width: wp("30%"),
    height: wp("30%"),
    marginTop: hp("1%"),
    marginBottom: hp("4%"),
  },
  inputContainer: {
    flexDirection: "row",
    alignItems: "center",
    width: "100%",
  },
  input: {
    flex: 1,
    height: 50,
    marginVertical: 10,
    borderWidth: 1,
    padding: 10,
    borderRadius: 5,
    borderColor: "#ddd",
  },
  eyeIcon: {
    position: "absolute",
    right: wp("2.5%"),
    padding: wp("2.5%"),
  },
  phoneIcon: {
    position: "absolute",
    right: wp("2.5%"),
    padding: wp("2.5%"),
  },
});

export default LoginScreen;
Output Result:


